Editor’s note: Today we welcome award-winning cheesemonger Julia Gross who shares how she puts together cheese boards. Her steps provide the framework for creating your own plate or board.
Cheesemonger Julia Gross photo courtesy of the author
If your various social media feed look anything like mine, you are probably seeing a parade of gorgeously decorated cheese boards, plates and charcuterie platters. They parade across my feed like a series of impressionist paintings with fruits, flowers and meat in oversaturated glory and I especially love it because I know each one of those plates is going off to make some gathering a little brighter, more exciting, even if that cheese plate winds up just being a snack for the photographer and their friends after a well done cheese shoot. A cheese plate is where entertaining meets art.
It seems daunting, I know, when you see perfectly photographed platters specially designed by experts, but making a beautiful plate is actually easy and fun. Here are a few simple steps that will flip you from cheddar squares to jealous stares in no time.
Cheese plate by Julia Gross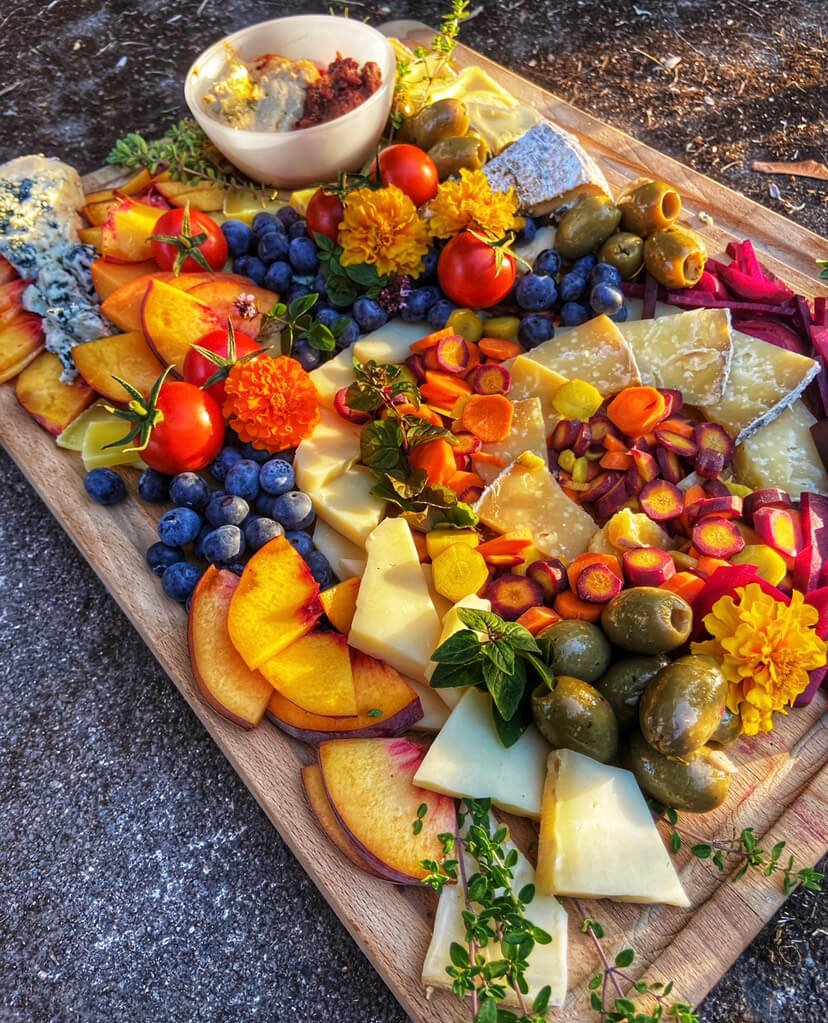
1. Before picking your cheeses, know your audience
Now this really doesn’t have much to do with the look of the cheese plate but as a cheesemonger I need to shout from the rooftops, serve cheese people will like. Is it an adventurous crowd? Are there vegetarians? Will someone have a panic attack if blue cheese winds up all over the plate? What’s the deal with raw cheeses? So the key to a great cheese plate starts with talking to your local cheesemonger. We are here to help!
Alright so now you have your cheeses. The step by step photos used in this article were made at my workplace, making cheese plates for holiday parties, since I didn’t know the crowd I went with catch all people pleaser cheeses and stayed away from blues and washed rinds. Also since blues tend to crumble and washed rinds tend to ooze and I had about ten plates to make in two hours I wanted to work with mostly firmer cheeses that would be easier to rearrange on my board if needed.

2. Prep All Your Ingredients
Get everything for your plate set up and ready to go. This will give you a more complete picture of how much you’re working with once it’s all plated. Since this is a professional cheese plate, I’m using a disposable platter. If I was at home I would use one of my wooden cutting boards or another matte platter, this is helpful if you want to photograph your creation.

3. Slicing the Cheese
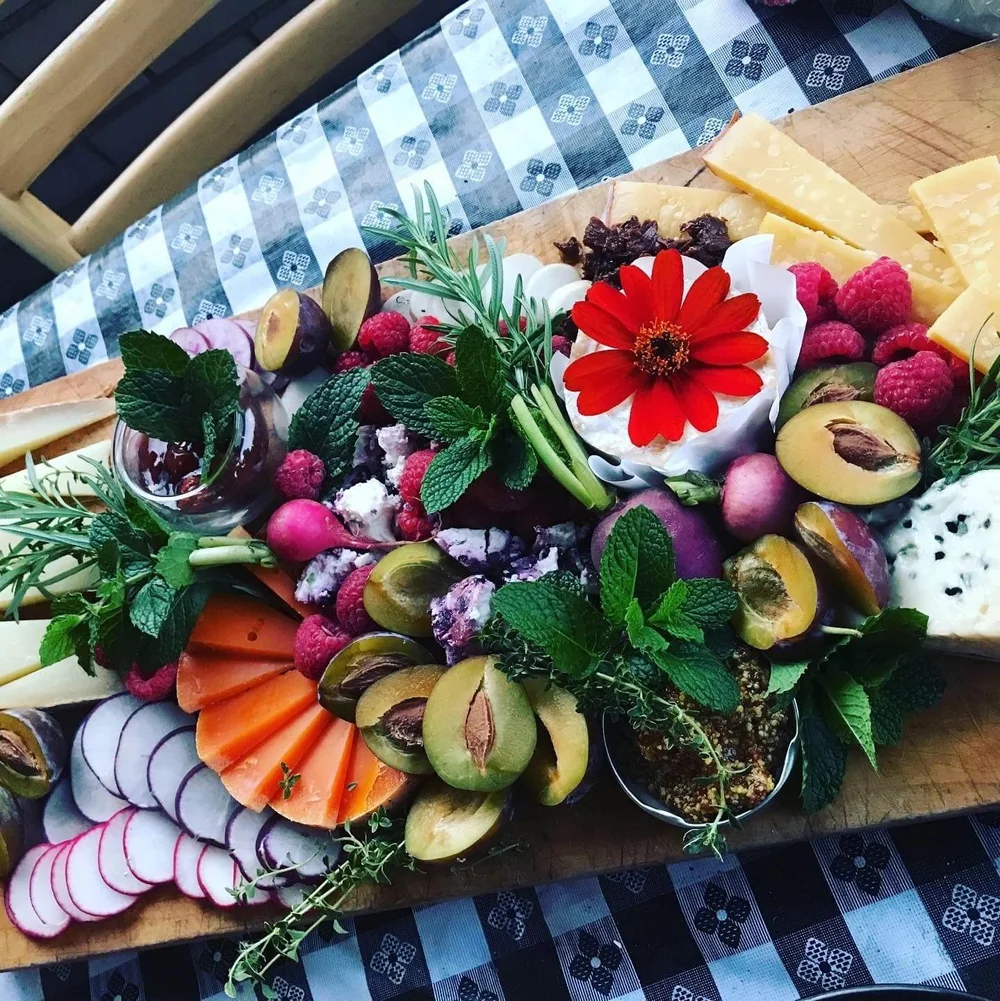
My favorite thing to put on a cheese plate is a fan of wedges, you can make them go any direction, or in spirals. I like to think of my cheese plate spiral designs as representative of the shape of the milky way, the universe’s cheese plate.
Edible rind cheeses
If the rind is yummy you can also cut your wedge down the middle before cutting fine slicing and go back and forth rind up and rind down to add texture to your plate. With soft bloomy rind cheeses you have two options, leave them uncut or position them in a way that they can’t ooze if they get warmer before the party.
Whole cheeses
I don’t trust anyone to not snag a whole langherino, the soft cheese featured on this plate, or a smaller camembert so I usually go for the cut.

4. Add Charcuterie
Now that you have your cheeses arranged it’s time for the meats. If meat isn’t your thing I’ll be getting to that later, don’t worry. Everyone likes a salami rose, but when you have ten cheese plates to make in two hours you cheat a little. What I like to do is take about three thin salami slices layered, fold them in half and roll, it isn’t a perfect rose but it will fill up your negative space quickly. These babies love to unravel so you need to move quick, I’ll also place a strategic nut or piece of fruit on the plate as a barrier wall if my roses are looking messy. If you have time or a smaller amount of salami, I highly suggest looking up how to make a true salami rose when you get a chance, just don’t forget your toothpicks. See how to make a salami rose with a glass or without.

5. Fill in the Negative Space
I really love using seasonal fruits and vegetables for my personal cheese plates. In fact, since most of my friends are vegetarian, I usually don’t have meat at all on my plates and rely mostly on fruit and spreads. I also think this makes for a truly vibrant plate.
Fruit
Apples and pears can brown and make a plate look old. Berries, both dried and fresh, are great for filling in difficult spaces.
Vegetables
Don’t be scared of veg. I love purple carrots and colorful beets on my plates and they’re delicious with cheese. If you add olives pour a teaspoon of olive oil over them so they don’t dry out and stay shiny. If you add flowers make sure they’re edible, non-edible items on party platters is a giant no. And talk to your cheesemonger! They might have some great ideas about a perfect pairing for those cheeses you picked out and it might be on the shelf right behind you.
Last but not least, take some time to admire the hell out of that cheese plate you just made. Maybe your first one isn’t exactly how you expected it to turn out, but hey, I bet it was really fun to make. Every plate is a chance to try out new tricks or change your style. I am still learning, with each plate, how to make a party even more lovely in my own special way and I am so proud of that. I hope you are too.

